ShopDreamUp AI ArtDreamUp
Deviation Actions


Suggested Deviants


Suggested Collections


You Might Like…


Featured in Groups

Description
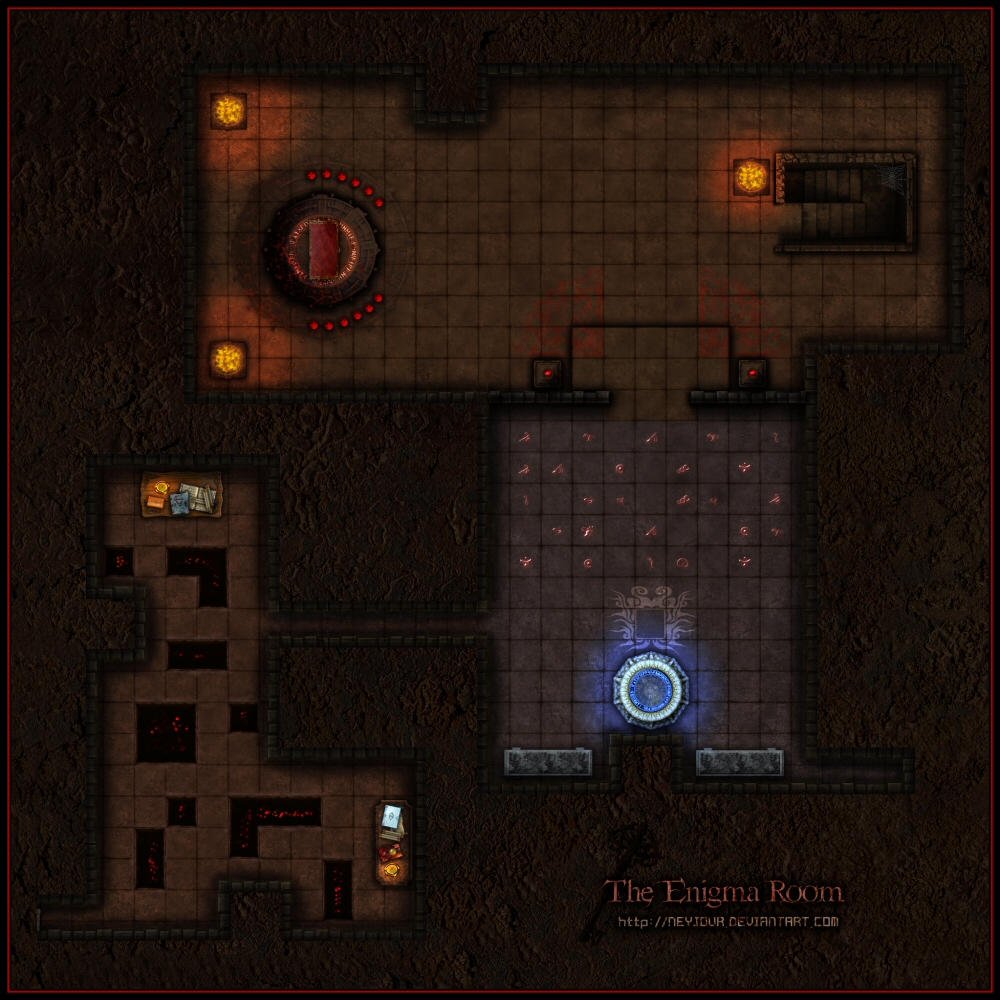
The Enigma Room © Christina Roberts (Neyjour) 2011
If you'd like to play on this, the zip download contains the full-rez version (2046 x 2046)
------------------------------
~RULES~
 Free to use for personal non-commercial purposes only.
Redistribution is NOT permitted. Please direct others to my deviantART gallery if they would like to download it.
My maps are NOT stock. Do not alter, manipulate, chop up, extract pieces, etc., and redistribute as your own work.
(If I find more instances of this happening, my maps will no longer be made available for free use.)
------------------------------
First Chamber:
 Using the Enigma Key (acquired from a previous adventure/encounter), enter the First Chamber. The door will automatically lock behind the last person in your group and there is no going back. Players may know this beforehand, or it might come as a complete surprise.
Avoiding the fire pits, gather up the books, scrolls and box of runes (there are twelve unique runes inside) from the two tables and continue on to the Second Chamber.
Second Chamber:
Study the information/clues/puzzles contained within the books and scrolls to figure out how to navigate the runes on the floor. There may be a specific combination/path you have to take to get to the next chamber, or maybe just certain runes you have to step on, or ones you have to avoid. It’s up to you to decide how you want to do that. I’ve included separate PNGs for each of the twelve runes in the zip download for you to use in creating your own clues, puzzles, etc.
Players then test the rune floor one at a time. Any wrong moves will result in magical “traps” being activated. Some may be fairly mild, while others could be very dangerous or even deadly.
Particularly nasty or deadly traps can be instantly deactivated by dropping a rune into the Dispelling Pool. This must be done by someone standing next to the pool, so make sure you are standing in the correct area and that the person currently testing the rune floor is not the one holding the runes!
When runes are used to dispell traps, the afflicted person is transported back to the Resurrection Stone in front of the Dispelling Pool, and you will have to start over again. It might be a good idea to take turns (or draw lots/roll dice) while testing the rune floor…unless there’s someone in your group you don’t like very much, who you want to be your sole “guinea pig”. ")
Don’t be frivolous with your use of the runes to dispell traps. Once you drop them into the Dispelling Pool they are gone forever, and this will significantly influence the outcome/rewards when you reach the Third Chamber.
Once your current tester has solved the rune floor, the rest of the group can proceed as well (following the correct combination/path) and continue on into the Third Chamber.
If you use up all twelve of your runes in the Dispelling Pool, the rune floor will deactivate and everyone can move freely into the Third Chamber without fear of harm. Unfortunately, this also means that you completely failed the test and will receive no rewards. This may also trigger something nasty to spawn in the Third Chamber, which your group will have to defeat before being able to leave the Enigma Room.
Third Chamber:
Place one rune in each of the twelve cups surrounding the treasure chest. This will unlock the chest, revealing your rewards/loot.
Hopefully you didn’t use up too many of your runes (or none at all if you were smart enough to solve the rune floor on the first try!) because the number of runes you have left to place in the cups determines the quality of your rewards. More runes equal better quality rewards, while less runes will yield meager/useless/disappointing rewards.
Once you’ve collected your rewards/loot, continue down the stairs to your next dungeon adventure!
------------------------------
~CREDITS~
PaperDecorative texture by Antje Hilgenfeld - CGTextures
SoilCracked texture by Jacobo Cortés Ferreira - CGTextures
Wall construction set - Dundjinni
Dungeon Tiles Set (Pit) by Jon Roberts - Fantastic Maps
Style Pack Dungeons (Flagstones) by Jon Roberts - ProFantasy
Classy Table - Dundjinni
Exotic Table - Dundjinni
Marble Bench by greytale - Greytale's Nook
Scroll of Kherty - Dundjinni
Rolled Scroll - Dundjinni
Old Brown Book by maraich - Dundjinni
Book of Stone by r-kelleg - Dundjinni
Book of Ice by r-kelleg - Dundjinni
Book of Flames by r-kelleg - Dundjinni
Book by katmagli - Dundjinni
Waxy Candle by r-kelleg (mod by The Madman) - Dundjinni
Jewel Box by Bogie - Dundjinni
Scrying Pool by greytale - Greytale's Nook
Tattoo by pur0nrg - Renderosity
Espruar Elvish font - ThievesGuild
Magic Circle - Dundjinni
Pillar by greytale - Greytale's Nook
Platform by Cisticola - The Zitting Cisticola
Gemstone by ProBono - Dundjinni
Brazier Font by greytale - Greytale's Nook
Fire - Dundjinni
Stairs - Dundjinni
Demon Chest by Bogie - Dundjinni
Cobweb - Dundjinni
Corner Brushes by khallandra-stock - deviantART
key...png by fatimah-al-khaldi - deviantART


~Paint Shop Pro 8
If you'd like to play on this, the zip download contains the full-rez version (2046 x 2046)
------------------------------
~RULES~
(If I find more instances of this happening, my maps will no longer be made available for free use.)
------------------------------
First Chamber:
Second Chamber:
Third Chamber:
------------------------------
~CREDITS~
PaperDecorative texture by Antje Hilgenfeld - CGTextures
SoilCracked texture by Jacobo Cortés Ferreira - CGTextures
Wall construction set - Dundjinni
Dungeon Tiles Set (Pit) by Jon Roberts - Fantastic Maps
Style Pack Dungeons (Flagstones) by Jon Roberts - ProFantasy
Classy Table - Dundjinni
Exotic Table - Dundjinni
Marble Bench by greytale - Greytale's Nook
Scroll of Kherty - Dundjinni
Rolled Scroll - Dundjinni
Old Brown Book by maraich - Dundjinni
Book of Stone by r-kelleg - Dundjinni
Book of Ice by r-kelleg - Dundjinni
Book of Flames by r-kelleg - Dundjinni
Book by katmagli - Dundjinni
Waxy Candle by r-kelleg (mod by The Madman) - Dundjinni
Jewel Box by Bogie - Dundjinni
Scrying Pool by greytale - Greytale's Nook
Tattoo by pur0nrg - Renderosity
Espruar Elvish font - ThievesGuild
Magic Circle - Dundjinni
Pillar by greytale - Greytale's Nook
Platform by Cisticola - The Zitting Cisticola
Gemstone by ProBono - Dundjinni
Brazier Font by greytale - Greytale's Nook
Fire - Dundjinni
Stairs - Dundjinni
Demon Chest by Bogie - Dundjinni
Cobweb - Dundjinni
Corner Brushes by khallandra-stock - deviantART
key...png by fatimah-al-khaldi - deviantART
~Paint Shop Pro 8
© 2011 - 2024 Neyjour
Comments17
Join the community to add your comment. Already a deviant? Log In
Which one is the previous adventure where they get the key from?